This C Language program prints numbers from 1 to 5 using for loop, do-while loop, and while loop in easy steps.
Change the counter value in case the user wants to print n numbers.
#include<stdio.h>
int main(){
int i=1,j=1,k=1;
//print number series using do while loop
do{
printf("%d \t",i);
i++;
}while(i<=5);
printf("\n");

//print number series using while loop

while(j<=5)
{
    printf("%d\t",j);
    j++;
}
//print number series using for loop
printf("\n");
for(int k=1;k<=5;k++)
  printf("%d\t",k);
return 0;
}
Output
1 	2 	3 	4 	5
1	2	3	4	5
1	2	3	4	5
By changing variable values one can print n number series in C language using three different loops.
Once the Downloaded file is ready for example Git-2.34.1-64-bit.exe then double click on it.
Click on the Next button for General Public license Window
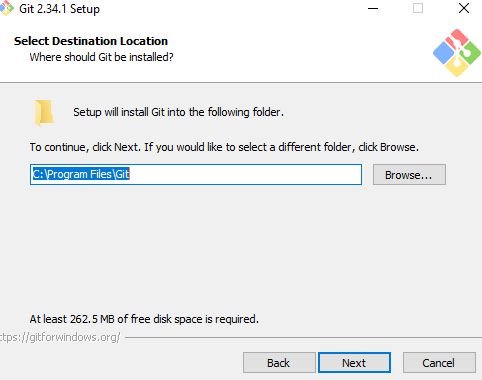
Select Destination Location folder where git has to install locally and Click on the Next button.
local git path
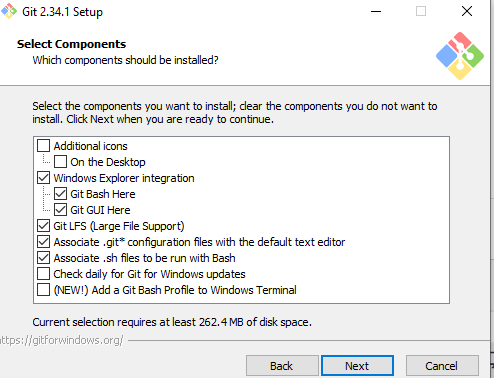
Click on the Next button
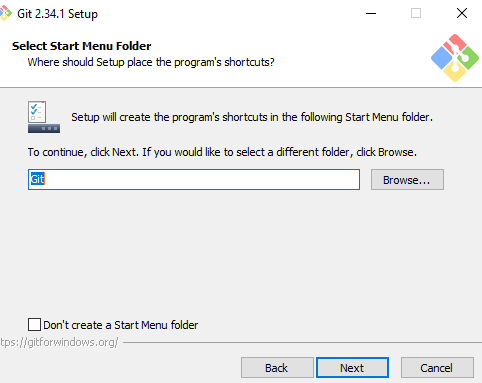
Click on the Next Button to select program shortcut.
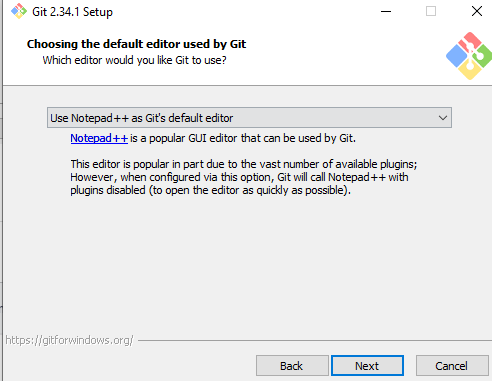
Select any Default Editor option from the dropdown. (Whichever editor is available on the system) and Click on the Next button.
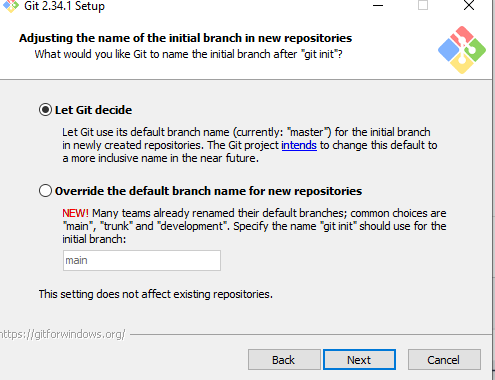
Click on the Next button and let git decide to use the default branch name.
Click next to adjust path environment (Keep recommended as it is)
Keep Default option selected for “Use Open bundled SSH”, “Use the open SSL Library” “Checkout Windows-style” Use MiniTty, and continue to click on the Next button unless you get the install button. Click on Install Button and wait for setup to complete.
Provide necessary information like new username (check for existence), Email Address, and Password
GitHub Will ask to verify the Account. After successful verification account will get created. The free account gives 500 MB space.
Note down your username and password.
Let’s create a simple project locally and upload it on github.
Create a Folder in any drive locally.
Here we are creating a folder in E Drive
E:\Github_C_Program
Open Visual Studio Code and using “File -> Select Folder” Menu select the folder which you created ( for example above we are selecting E:\Github_C_Program)
Local folder in GitHub
Click on New File and Add any html, java, php, c language code in that file and name is accordinly.
Here we have created c program file and added some code in the file
Now we need to upload the above C Project to Github. To perform that we need to
Initialize Repository
Commit Code
Config git (First Time)
Add Remote (Location)
Push Code to Git Hub
First time it will ask to provide GH login password
If require PUsh code again.
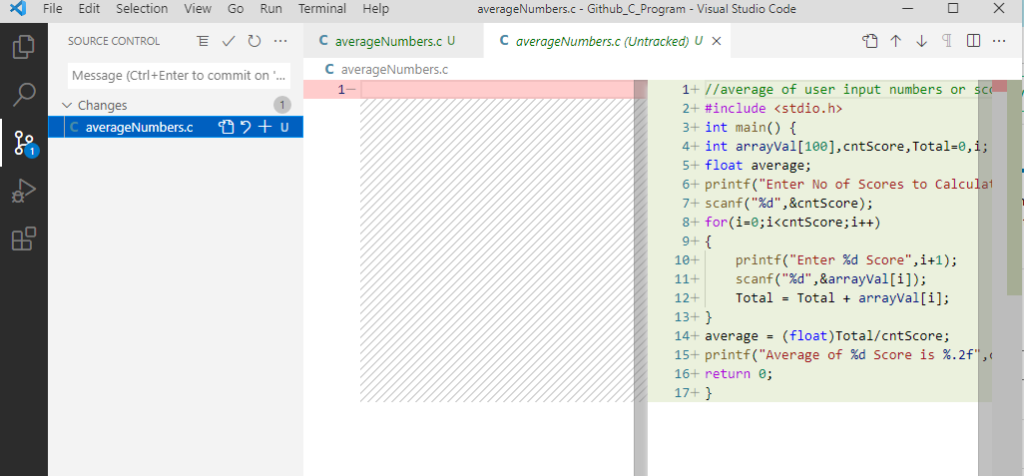
Click on Source Control and Click on Initialize Repository.
The system will display similar files which are available in the projects folder
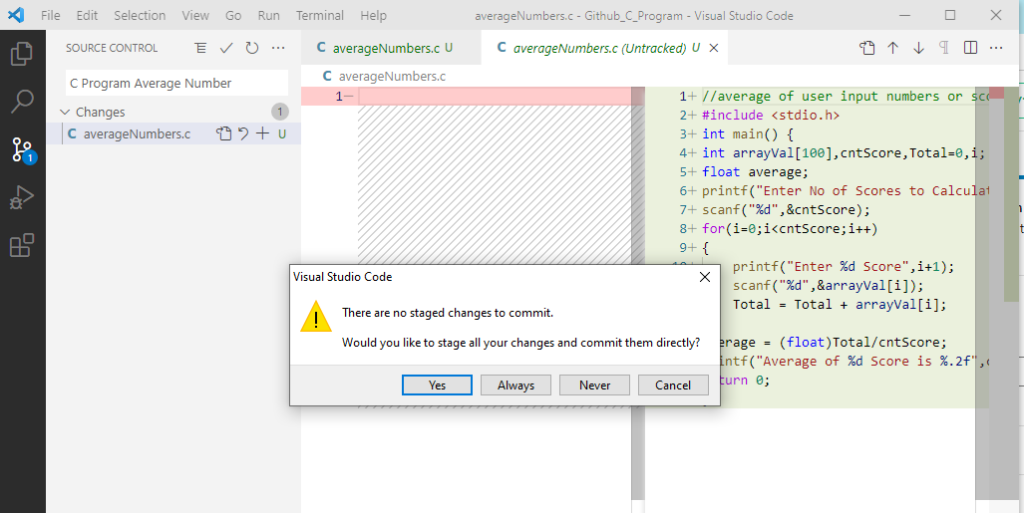
Click on the Commit button (Richt Check Sign) and provide the necessary comment in the message section.
Click on Yes Button so that it will ask always before committing.
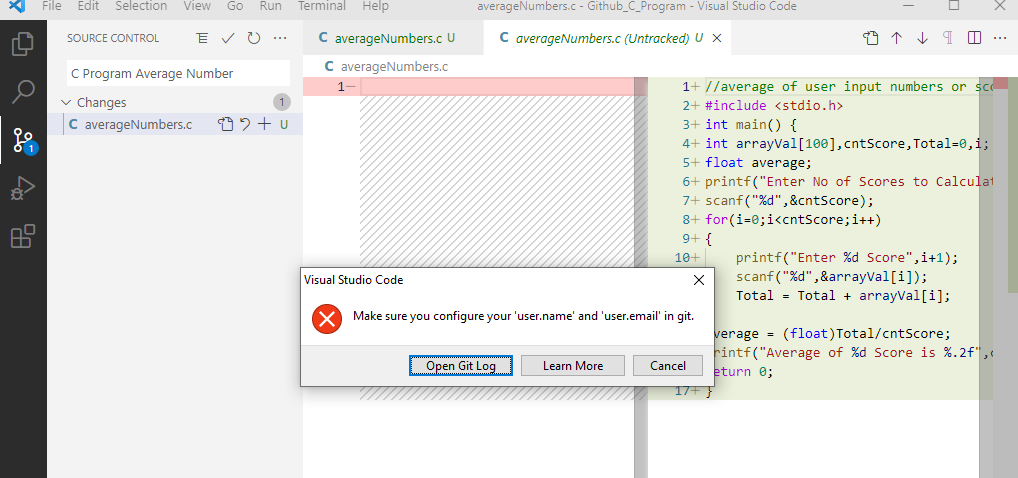
The system will throw an error message as git is not configured with VS Code.
In this situation click on Open Git Log button. An editor will display log information in Output Tab like below
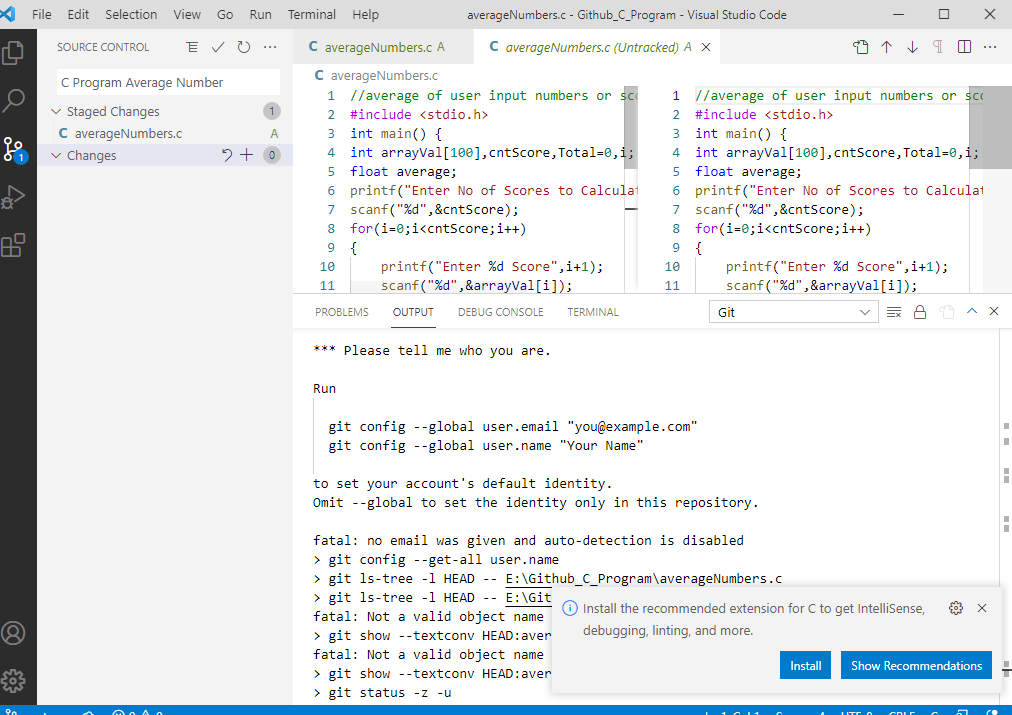
To config studio with git permanently you need to run the below command on the Git Command prompt.
git config –global user.email “you@example.com”
git config –global user.name “Your Name”
Make sure to replace the correct email ID which you used while creating GitHub Account
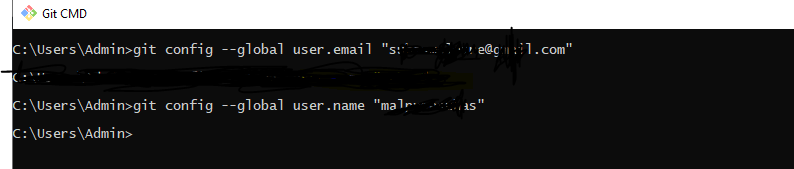
Type Git CMD” in Search and open Git CMD Prompt. By replacing the appropriate email id and Name run the command one by one like below.
Now Go to Visual Studio Editor Again and click on commit again. If you observe code is committed successfully locally.
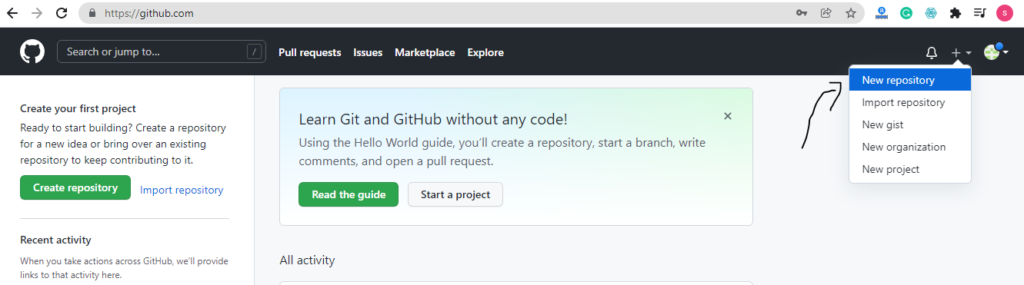
to Push it to Git Hub we need to create one Repository. To do this login to https://github.com/. We have already created a username and password in earlier steps. Click on the New Repository menu as shown below.
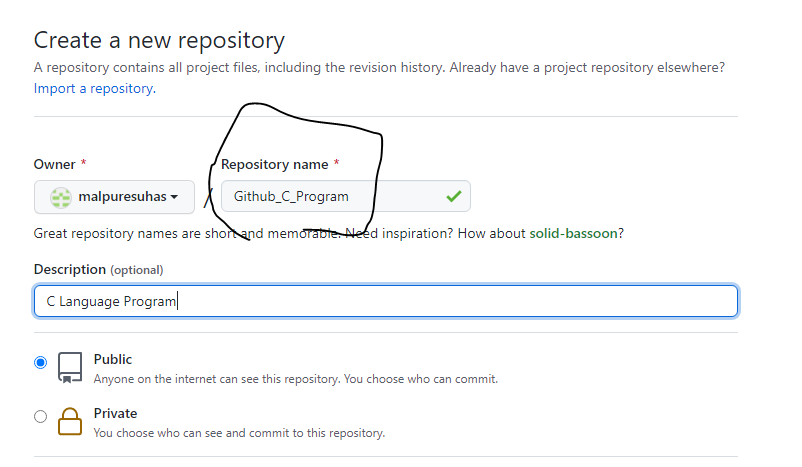
Provide Repository Name same as project Name like below
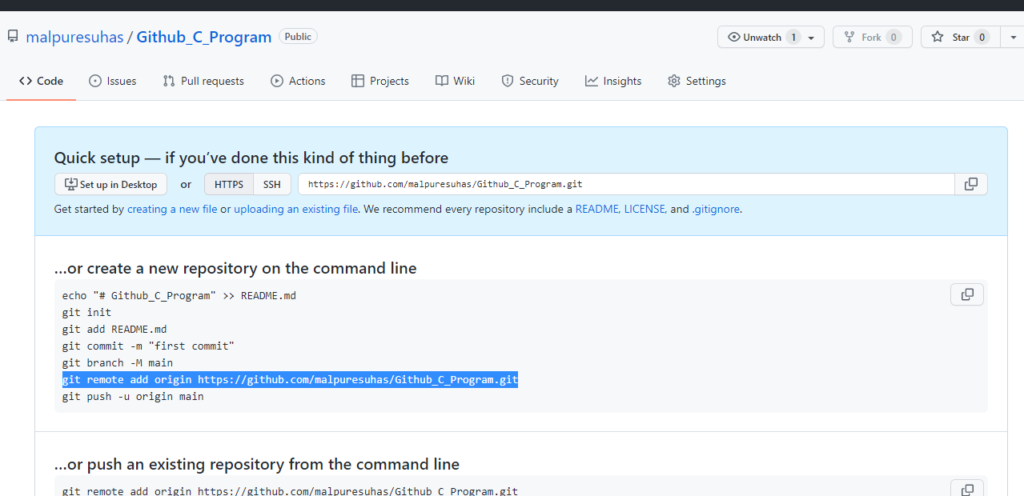
After Clicking on Create New Repository Button GitHub will display the below message.
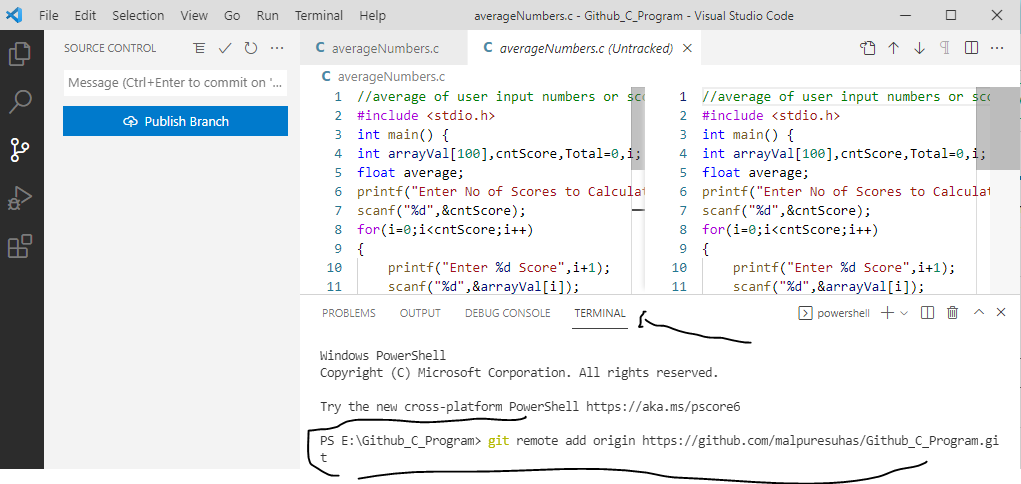
Copy the Above highlighted line ( Make sure it should contain your project name and username) and past it on visual studio code terminal and press enter. like below
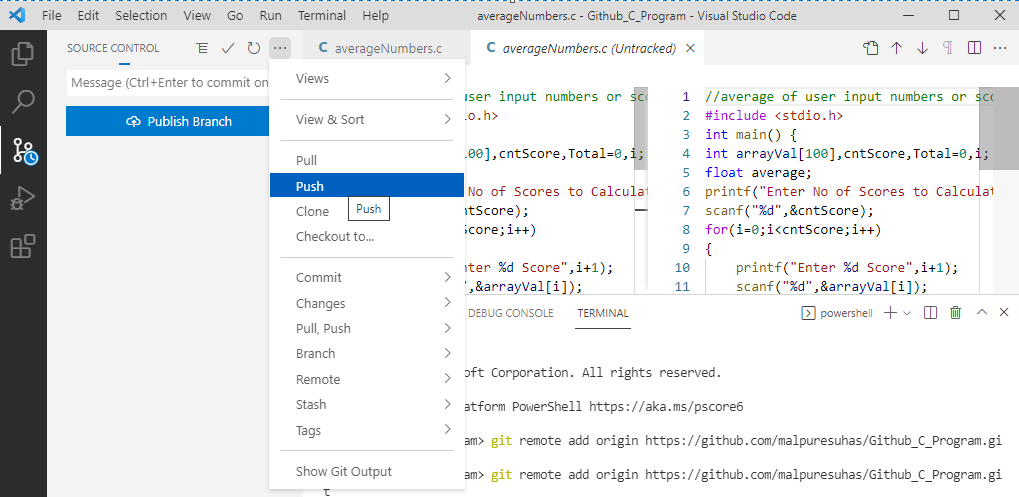
Now Visual Studio Code is now aware of where it has to push the code. So click on the menu mentioned below to push the code
The first time it will ask you user name and password again. You can provide it if asked.
To conclude after performing every step as mentioned as shown above it will be easy to configure Visual studio code with GitHub.
Once both cypress and Editor are available on the machine then perform the below steps.
Step 1) Open Visual Studio Code.
Step 2) Create a new folder to store the project files or Open any existing project folder to store files.
Step 3) Click on New File menu as shown below.
New file Code
Step 4) Type package.json and save it.
Step 5) In Package.json file need to mention cypress for dev dependency. To do this we have multiple ways. From Terminal Menu Click on New Terminal Menu. We can use this terminal within IDE.
Terminal within IDE
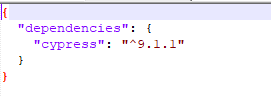
Step 6) Type command “npm install –save-dev cypress” on Terminal and Wait because this will search for package.json file to install the dev dependencies. so add the below code in a package.json file (use IntelliSense if require to type)
“devDependencies”: { “cypress”:”^9.1.1″ }
While writing this blog 9.1.1 was the latest version so use IntelliSense to get the latest version in place of copy-paste.
Save the file and Hit the command “npm install –save-dev cypress” on the terminal.
The terminal will display the below message after installation
PS E:\Cypress Projects> npm install –save-dev cypress npm WARN deprecated querystring@0.2.0: The querystring API is considered Legacy. new code should use the URLSearchParams API instead.
added 163 packages, and audited 164 packages in 49s
24 packages are looking for funding run npm fund for details
found 0 vulnerabilities PS E:\Cypress Projects>
Installing Cypress Dev Dependencies from Termal using Code Editor.
The above command will install the latest version of cypress within your project.
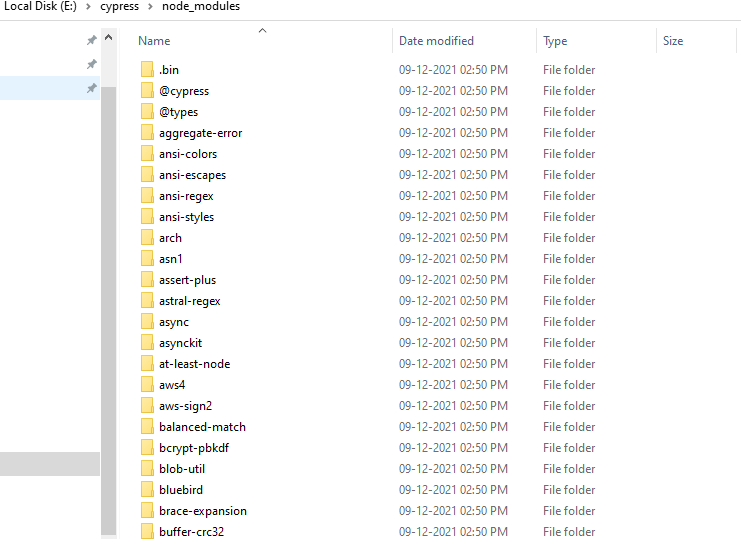
All helpful methods after pressing dot in code editor are coming from node_modules -> @types -> index.d.ts file.
Successful installation of cypress with dev dependencies within the project folder using the code editor.
Step 7) How to create Cypress package
In Terminal type command “npx cypress open” and press enter.
It will show a message like this
It looks like this is your first time using Cypress: 9.1.1
Solution for the above error is Relaunch cypress one more time. If that doesn’t work then change
VERIFY_TEST_RUNNER_TIMEOUT_MS value to 100000 Which is by default is 30000. ” VERIFY_TEST_RUNNER_TIMEOUT_MS ” is available under verify.js file located “node_modules\cypress\lib\tasks\verify.js” Save the changes and type command “npx cypress open” and press enter.
After successful configuration, the user will see cypress Test runner window like below.
cypress window after successful configuration and installation with code
Step1) Open command Prompt (type cmd in search and press Enter)
Step 2) Type command ” npm uninstall cypress”
The system will start uninstalling cypress and will show the below message.
C:\Users\Admin>npm uninstall cypress
removed 163 packages, and audited 1 package in 15s
found 0 vulnerabilities
Step 3) If you get below error then try to navigate to the directory where cypress is installed from the command line
npm ERR! code EPERM npm ERR! syscall mkdir npm ERR! path E:\ npm ERR! errno -4048 npm ERR! Error: EPERM: operation not permitted, mkdir ‘E:\’ npm ERR! [Error: EPERM: operation not permitted, mkdir ‘E:\’] { npm ERR! errno: -4048, npm ERR! code: ‘EPERM’, npm ERR! syscall: ‘mkdir’, npm ERR! path: ‘E:\’ npm ERR! } npm ERR! npm ERR! The operation was rejected by your operating system. npm ERR! It’s possible that the file was already in use (by a text editor or antivirus), npm ERR! or that you lack permissions to access it.”
Step 4) Navigate to the directory where cypress is installed using the cd command in the command line
Step 5) Type command “npm uninstall cypress” and press enter
After a couple of seconds, the system will uninstall cypress and will show the below message.
removed 163 packages, and audited 1 package in 6s
found 0 vulnerabilities
If you want to reinstall cypress from step 1 on windows then follow the article install cypress on windows.
To remove dependencies from the package.json file we can use the command “npm uninstall <name> –save”
This will uninstall cypress and also remove dependencies from the package.json file.
Users can install cypress on windows by giving the single command “npm install cypress”. But to run this command it is important that npm is installed on the machine.
How to check if npm is installed on the machine or not?
Navigate to command prompt and type command npm -v
If windows show any version then npm is installed on a machine. If no version is specified then follow the article to install npm on windows.
Once NPM is available on windows then type the command “npm install cypress” and press enter.
After successful installation type command “npx cypress –version” and press enter to check if cypress is installed or not.
NPM Stands for Node Package Manager, which is an application and repository for developing and sharing JavaScript code.
What are Node and Node JS?
Node and Node JS are similar, Node is just a shorter way to describe Node JS. Node or Node JS refers to the javascript runtime environment that allows you to write server-side code.
Cypress is capable to test anything which runs on a chrome browser. The architecture surrounding Cypress is built to handle modern JavaScript frameworks.
Cypress is the best tool to automate web app built on the latest React, Angular, Vue, Elm, etc. frameworks.
Cypress is easy to install just by using the command “npm install cypress”
Do not compare cypress with selenium. Both have different architecture to identify elements. End to end Web automation is possible with cypress. Cypress can perform unit testing, Database Testing, UI Testing.
Cypress is an open-source front-end testing tool built for modern applications.
Cypress is not selenium. Cypress is built with the new architecture. Cypress uses the same run-loop in place of communicating with different drivers like selenium.
Cypress does not depend on third-party drivers.
When users want to automate any project then they have to install Frameworks like mocha, jasmine , QUnit, Karma.
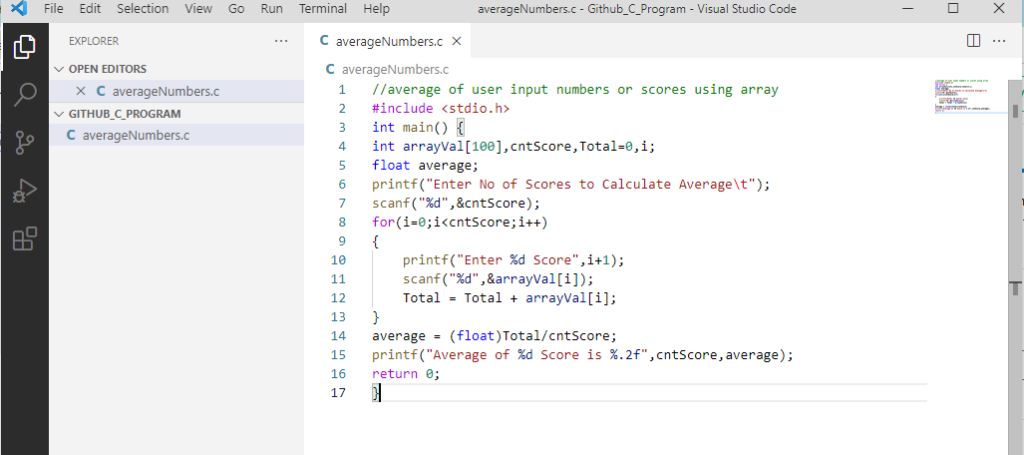
This program accepts users to input up to any number and stores it Array. Then calculate the average of stored numbers by calculating the total or sum and then dividing it by a number of inputs.
This C program uses an array to store scores or numbers in a declared array.
In for loop program ask the user to input numbers and store them in the array.
Once the loop is over code calculate the average.
//average of user input numbers or scores using array
#include <stdio.h>
int main() {
int arrayVal[100],cntScore,Total=0,i;
float average;
printf("Enter No of Scores to Calculate Average\t");
scanf("%d",&cntScore);
for(i=0;i<cntScore;i++)
{
    printf("Enter %d Score",i+1);
    scanf("%d",&arrayVal[i]);
    Total = Total + arrayVal[i];
}
average = (float)Total/cntScore;
printf("Average of %d Score is %.2f",cntScore,average);
return 0;
}
Output
Enter No of Scores to Calculate Average	3
Enter 1 Score	11
Enter 2 Score	22
Enter 3 Score	33
Average of 3 Score is 22.00
ASCII stands for American Standard Code for Information Interchange. Like how we understand A to Z in simmilar way machine understand A to Z in some language. So let’s see what is ASCII value of A to Z which require to perform electronic communication. modern character-encoding schemes are based on ASCII.
To print ASCII value of A to Z in C Programming Language. ASCII contains fix integer value.
So in this program will print the A to Z and using %d we will try to print associated ASCII Value for each character. So to get below output here is complete c program code.
Output
ASCII Value of A is 65
ASCII Value of B is 66
ASCII Value of C is 67
ASCII Value of D is 68
ASCII Value of E is 69
ASCII Value of F is 70
ASCII Value of G is 71
ASCII Value of H is 72
ASCII Value of I is 73
ASCII Value of J is 74
ASCII Value of K is 75
ASCII Value of L is 76
ASCII Value of M is 77
ASCII Value of N is 78
ASCII Value of O is 79
ASCII Value of P is 80
ASCII Value of Q is 81
ASCII Value of R is 82
ASCII Value of S is 83
ASCII Value of T is 84
ASCII Value of U is 85
ASCII Value of V is 86
ASCII Value of W is 87
ASCII Value of X is 88
ASCII Value of Y is 89
ASCII Value of Z is 90
#include <stdio.h>
int main()
{
    char ascCh; //declaring variable which start from Alphabet A
    for(ascCh='A'; ascCh<='Z'; ascCh++)
    {
        printf("ASCII Value of %c is %d\n", ascCh,ascCh);
    }
    return 0;
}
While running any python program if the user receives an error like IndentationError: expected an indented block. This means indentations are not proper.
Let’s see the below example and how to solve the error IndentationError: expected an indented block.
Below code with Error
a = 4
b = 5
if a > b:
print ('A is maximum')
else:
print ('B is maximum')
Output
File "<string>", line 4
    print ('A is maximum')
    ^
IndentationError: expected an indented block
If we observe in code that there is indentation available for if and else condition, as a result, python throws an error message.
To resolve error we need to provide indentation to statements after If condition. So we try to provide uniform spaces for statements after if conditions like below
a = 4
b = 5
if a > b:
    print ('A is maximum')
else:
    print ('B is maximum')
After indentation output is
B is maximum
In conclusion, the indentation needs to be consistent. It is recommended to use 4 spaces for indentation in Python.